
Ten knots cover almost everything that happens on a boat. Flip through them as flashcards, then let the quiz ask you both ways: given the situation, which knot, and given the knot, what is it for. Recognising a knot is not the same as knowing when to reach for it.
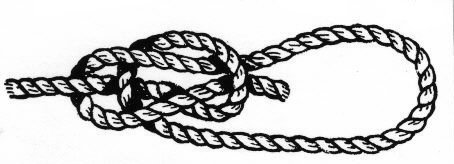
Bowline
Loops
Bowline
When to use it: A fixed loop that will not slip or jam, however hard it is loaded. The sheet onto a headsail clew, a line round a post, a loop to drop over a bollard.
Tying it: Make a small loop in the standing part, bring the end up through it, around behind the standing part, and back down through the loop.
Diagram: Pearson Scott Foresman, Public domain
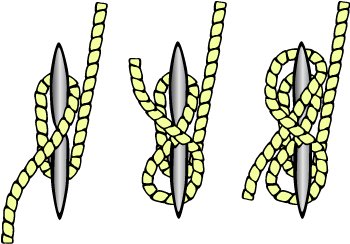
Cleat Hitch
Docking
Cleat Hitch
When to use it: Making a line fast to a cleat, on the dock or at the mast. The knot you use more often than any other.
Tying it: One full turn round the base, then figure of eights over the horns, finished with a single locking hitch. One lock, never three.
Diagram: Jazzmanian at English Wikibooks, Public domain
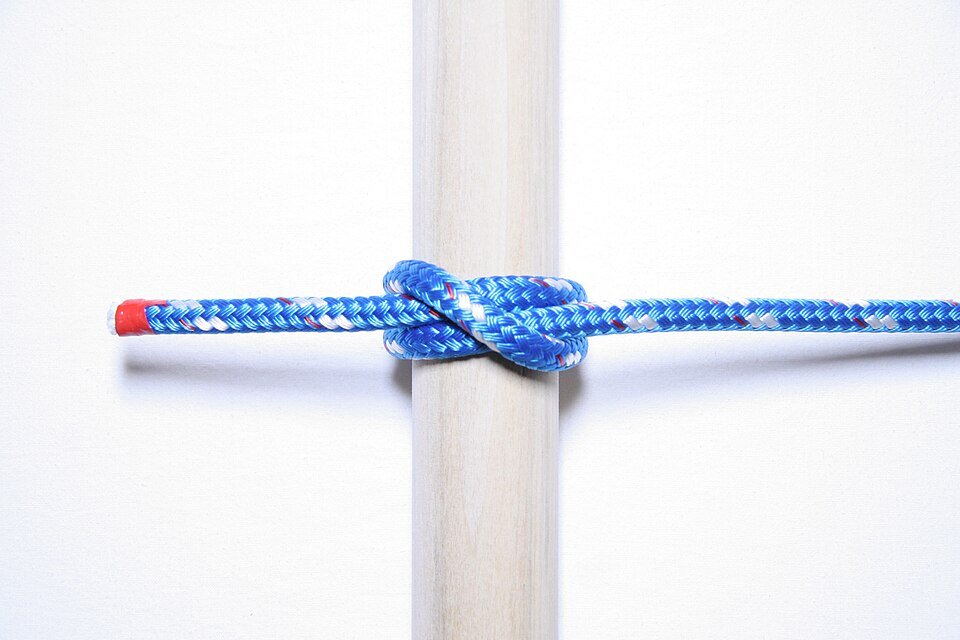
Clove Hitch
Docking
Clove Hitch
When to use it: A fast temporary hitch to a rail or post. Fender lines are the classic use, because the height is easy to adjust.
Tying it: A turn round the rail, a second turn crossing over the first, and the end tucked under that second turn.
Diagram: USCG PTC Developer, CC0
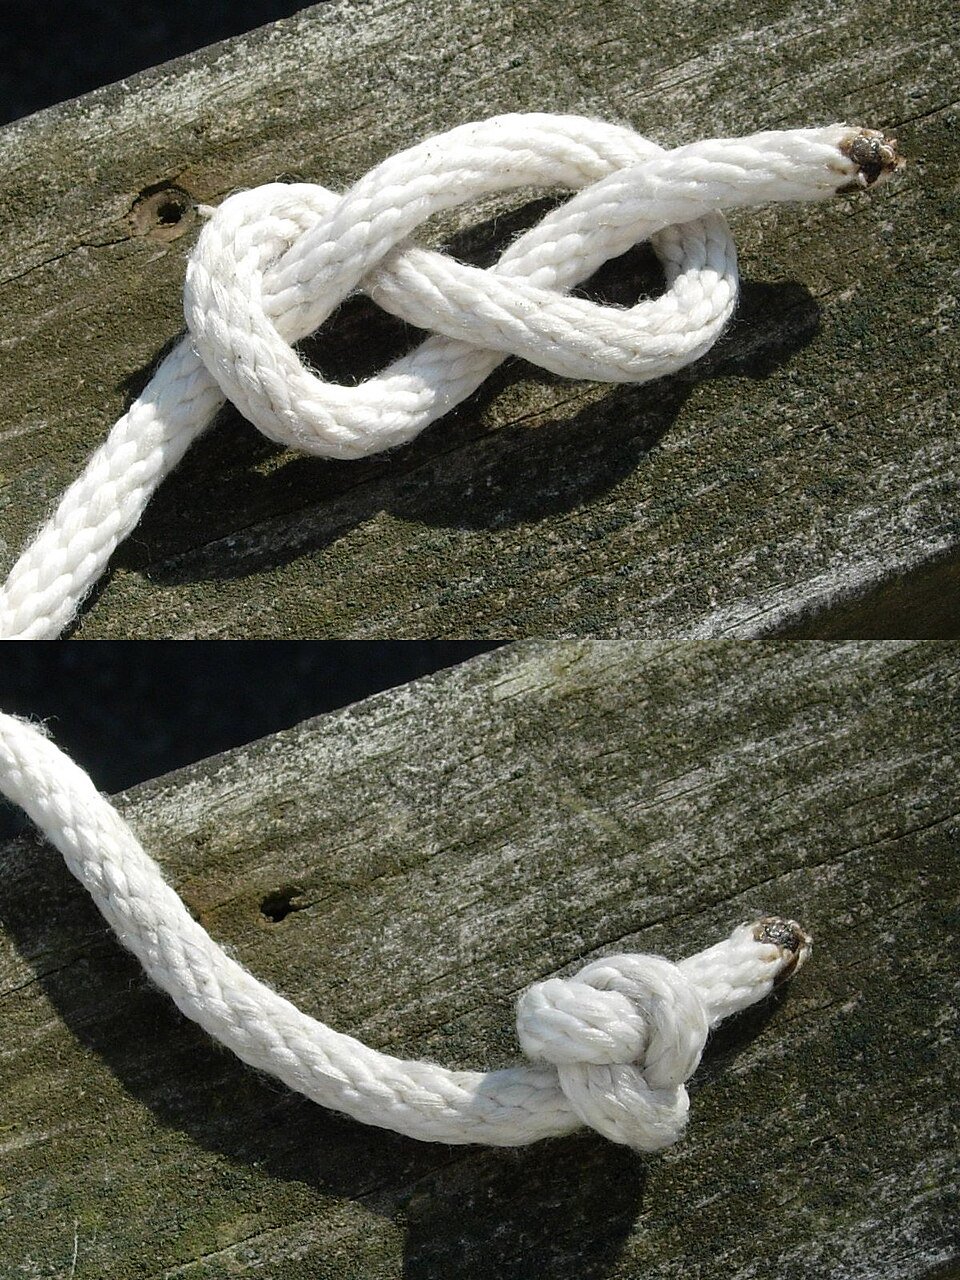
Figure-Eight
Stoppers
Figure-Eight
When to use it: A stopper in the end of a sheet so it cannot escape through the block and leave a flogging sail out of reach.
Tying it: Over the standing part, under it, and back through the loop it makes.
Diagram: Just plain Bill, CC BY-SA 3.0
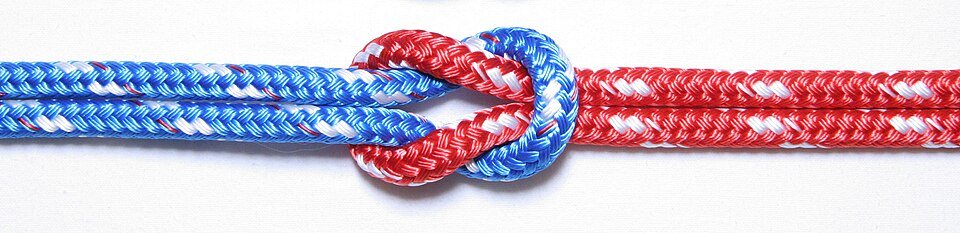
Reef Knot
Binding
Reef Knot
When to use it: Joining the two ends of one line around a bundle, such as a furled sail tied with sail ties. Not a knot for joining two separate ropes under load.
Tying it: Left over right and under, then right over left and under. Get it the wrong way round and you have a granny, which slips.
Diagram: USCG PTC Developer, CC BY-SA 4.0
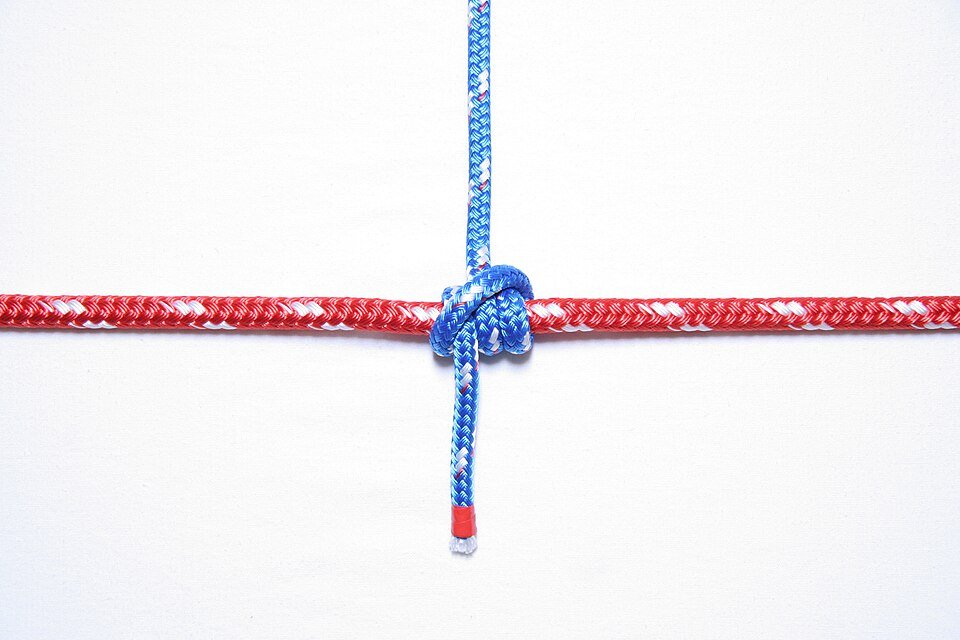
Rolling Hitch
Hitches
Rolling Hitch
When to use it: Gripping another rope or a spar lengthwise. The knot that takes the load off a riding turn on a winch or a jammed sheet.
Tying it: Two turns around the object, both riding over the standing part on the loaded side, then a half hitch on the other side.
Diagram: USCG PTC Developer, CC BY-SA 4.0
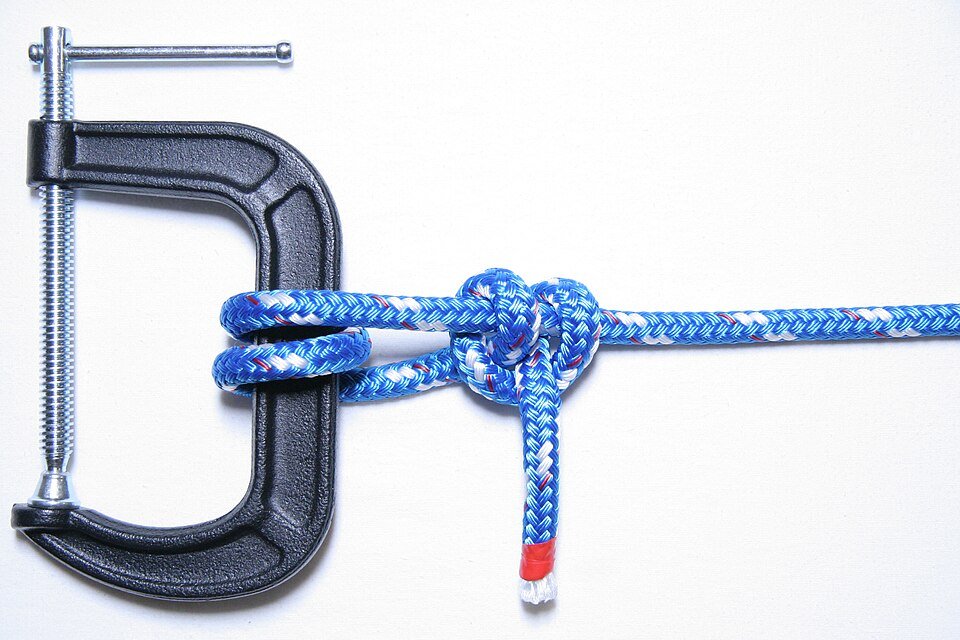
Round Turn and Two Half Hitches
Hitches
Round Turn and Two Half Hitches
When to use it: Making fast to a ring, rail or mooring post when the line is already under load. The round turn holds while you tie the rest.
Tying it: A full round turn through or around the fitting, then two half hitches around the standing part.
Diagram: USCG PTC Developer, CC BY-SA 4.0
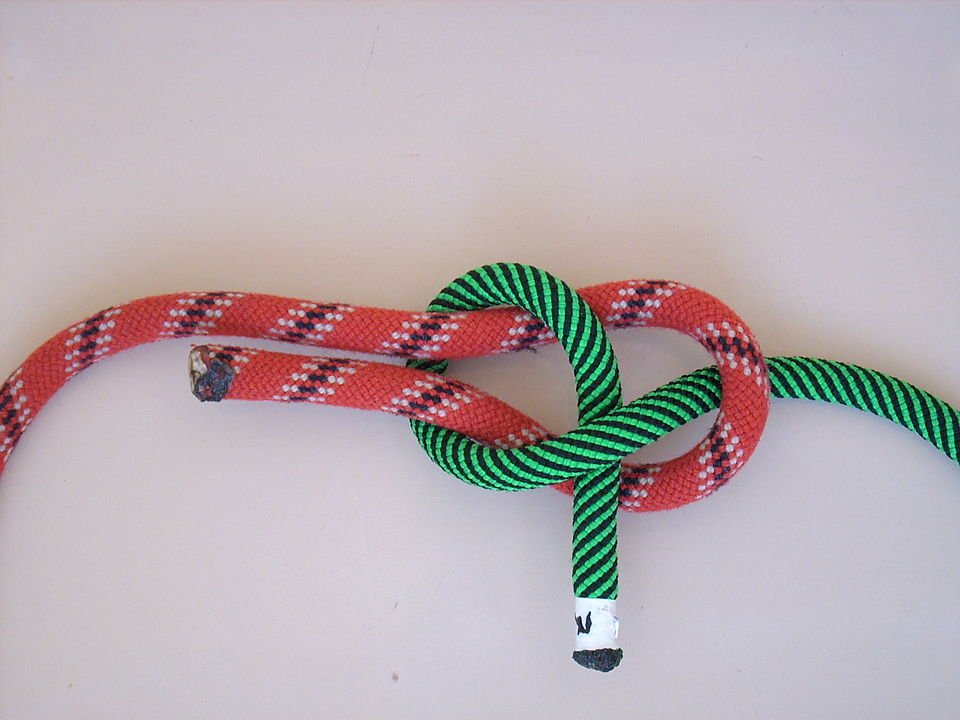
Sheet Bend
Bends
Sheet Bend
When to use it: Joining two ropes, and the right choice when they are different thicknesses, where a reef knot would slip.
Tying it: A bight in the thicker rope. The thinner one up through the bight, around behind both parts, and tucked under itself.
Diagram: Markus Bärlocher, Public domain
Anchor Bend
Bends
Anchor Bend
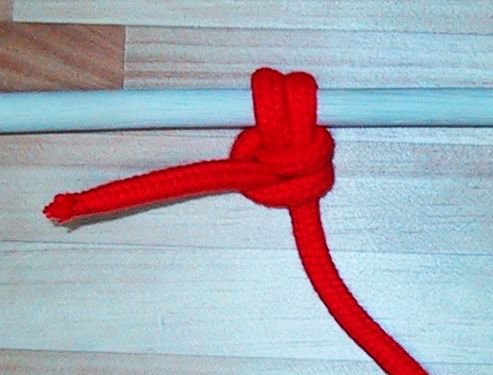
When to use it: Bending a rode to an anchor ring. Also called the fisherman’s bend, and it holds under the steady load and motion an anchor rode sees.
Tying it: Two round turns through the ring, a half hitch taken through both turns, then a half hitch around the standing part.
Diagram: CC BY-SA 3.0
Trucker’s Hitch
Purchase
Trucker’s Hitch
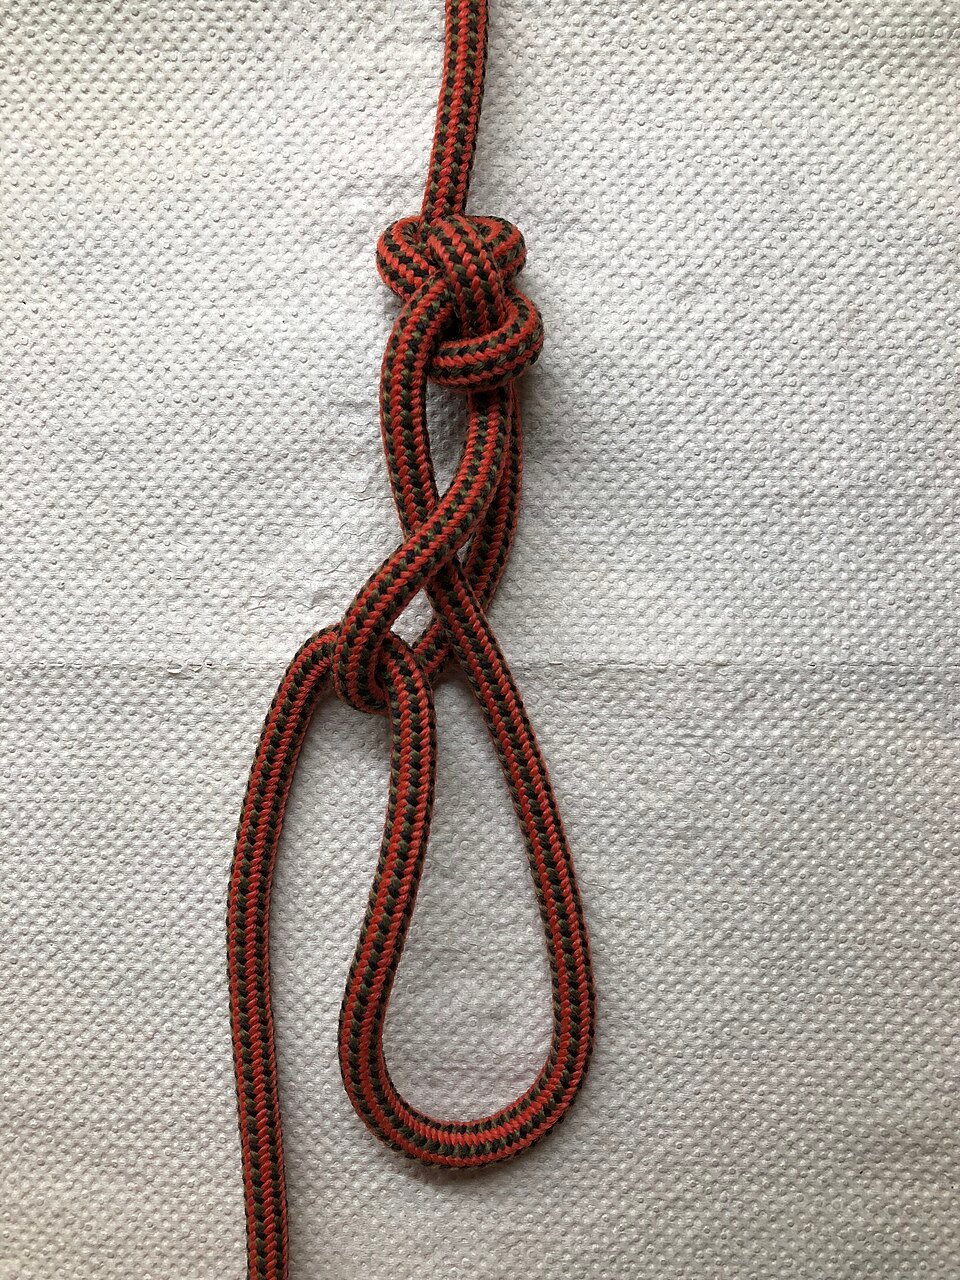
When to use it: Getting real tension into a line: lashing gear on deck, tensioning an awning, rigging a boom preventer.
Tying it: A loop in the standing part, the end round the anchor point and back up through the loop, haul down hard, then lock off with two half hitches.
Diagram: Cobanyastigi, CC0
Why These Ten
There are thousands of knots and a working sailor uses a handful. The ten here were chosen because each one does a job the others cannot, and together they cover docking, anchoring, sail handling and the moments when something has gone wrong.
If you learn them in order of how often you will need them, it looks like this:
- Docking: cleat hitch first, then the clove hitch for fenders, then the round turn and two half hitches for anything under load.
- Sail handling: the bowline, which puts a fixed loop anywhere you need one, and the figure-eight as a stopper so sheets cannot escape through a block.
- Anchoring: the anchor bend for the rode, and the rolling hitch when you need to take load off something that is already loaded.
- Everything else: the reef knot for tying a bundle, the sheet bend for joining two ropes, and the trucker’s hitch when a line has to be genuinely tight.
If you only ever learn three, make them the bowline, the cleat hitch and the round turn with two half hitches. Those three will get you through most days afloat. Twelve knots every sailor should know covers the wider set in detail.
The Distinctions That Matter
A reef knot is not a bend. It ties the two ends of one line around a bundle, which is why it works on sail ties. Use it to join two separate ropes under load and it can capsize and let go. Joining two ropes is what the sheet bend is for, and it is the right answer when the ropes differ in thickness.
A clove hitch is convenient, not permanent. It adjusts beautifully for fender height and it can work loose under a changing load. For anything that matters, the round turn and two half hitches is the better hitch, because the round turn takes the strain while you tie the rest.
The rolling hitch is the one that saves you. When a sheet has a riding turn on the winch and is loaded so hard you cannot free it, a rolling hitch onto that sheet lets you take the load elsewhere and sort the mess out. It grips lengthwise along another rope, which no other knot here does.
One lock on a cleat, not three. A cleat hitch needs a turn, some figure of eights and a single locking hitch. Adding more locks does not make it safer, it makes it jam under load, and a line that cannot be released quickly is a hazard in itself. That matters most when docking, where a line may need to come off fast.
Learning Them So They Stick
Reading about knots does not teach your hands anything. Keep a metre of line somewhere you sit, and tie each knot until you can do it without looking at the diagram.
Then make it harder on purpose. Tie the bowline one-handed, behind your back, and in the dark. That sounds like a party trick until the night you need a loop in a hurry on a pitching foredeck with a torch in your teeth. The same goes for the knots you will use when anchoring and when picking up a mooring, which are both jobs done at the bow while the boat is moving.
The quiz asks in both directions deliberately. Most people learn to recognise a knot long before they learn to choose one, and choosing is the skill that matters when something is going wrong.
Frequently Asked Questions
Common questions about sailing knots:
Which Knot Should I Learn First?
The bowline. It puts a fixed loop wherever you need one, holds under load, and unties afterwards even when it has been loaded hard, which is more than most knots manage.
Why Does My Knot Jam and Refuse to Untie?
Usually the wrong knot for the job, or too many locking turns. A bowline is chosen precisely because it comes undone after loading. A reef knot under heavy strain, or a cleat with three locks on it, will fight you.
Does Rope Type Change Which Knot Holds?
Yes. Slippery modern lines such as Dyneema hold knots far less reliably than polyester, and some need a different approach or a splice instead. If a knot slips in a high-tech line, the line is the reason.
How Many Knots Do I Actually Need?
Three will get you through most days: bowline, cleat hitch, round turn and two half hitches. The other seven each solve a specific problem, and you will meet those problems eventually.
Is the Anchor Bend the Same as a Fisherman’s Bend?
Yes, two names for the same knot. It suits an anchor rode because it stays secure under a steady pull with the constant small movements an anchored boat makes.